Back to aPriori Blog Home

Abe Chaves
| January 10, 2020
Share:
Setting and achieving the right cost targets is essential for increasing profit margin wherever possible while staying highly competitive in the marketplace.
Of course, a product’s cost can only be altered so much once its design is finalized. To set and achieve targets that are truly aligned with the factors driving costs, robust costing tools need to be integrated with the design process itself.
In this article, we define target costing and take a look at how cost targets can be effectively integrated with product design.
What Is Target Costing?
Target costing is the practice of establishing product design and development targets that will result in a product with an ultimate market price that is both: A) competitive with target customers and B) profitable for the manufacturer.
While post-design factors like distribution and administration make up some portion of the cost equation (more on this below), a large portion of costs are effectively locked in once a design and manufacturing process has been specified. This reality means that effective cost targets will need to be decomposed to reflect cost drivers stemming from each aspect of a product’s design.
What Is Target Cost?
A product’s target cost is the expected selling price of the product minus sales/administration expenses and desired manufacturing profit margin.
Effectively, target cost measures the cost level needed to make a certain profit at a competitive market price.
Different Methods for Setting Targets
It is possible to set product cost targets simply by comparing them to past projects: “what did this cost last time?” In this approach, companies review prior products, parts, and purchases and then set cost targets solely based on past costs. While this historical data may be helpful, effective cost targets will have no bearing on future profitability if they don’t reflect current market conditions.
Similarly, a “cost-plus” approach (estimating costs and then adding a profit margin) won’t generate a cost that necessarily reflects competitive pressures. Prices set without analysis of market prices risk either a non-competitive price or unnecessarily leaving a profit margin on the table (if your organization builds a more cost-effective product).
The most impactful target costing begins with establishing a market price for the product being developed. Market research determines the price of similar products on the market, potentially adding some price premium to reflect competitive intelligence on factors like brand reputation, quality differential, and feature set.
How to Calculate Target Cost
In order to establish proper cost targets, you need first to establish a market price, then subtract the amount you want to make for your potential profit. The difference is the target cost for the product: the “whole” or “total product cost.”
Target Costing Formula
At a high level, we can think of the target cost equation as follows:
Target Cost = (Selling Price )/(1+ Desired Profit %)
The graphic below demonstrates the strategic implications of the differing methodologies above. Under the first “left-to-right” method, costs drive pricing.
By moving to a “right-to-left” approach, market conditions can inform efficient design and manufacturing decisions by providing profitable cost targets. As we’ll see below, the core task becomes translating this market price into design-level insight.
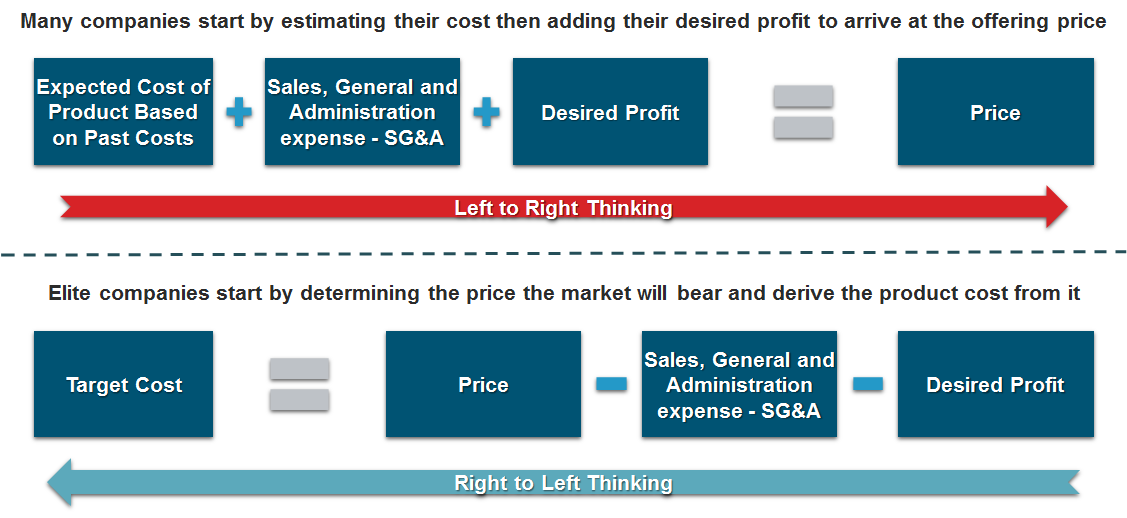
Figure 1. Different methods for establishing cost targets: starting with expected cost vs. starting with the market price.
Total Product Cost Target Example: Lawn Mower
Suppose that you currently offer both a 20-inch lawn mower and a 24-inch lawn mower. You are embarking on a development process that will allow you to offer a 30-inch mower. You have determined from your market research that the target market price for this mower is $275.
Furthermore, you know that your distribution costs and the profit your retailers take will total $100, and you want a profit of $50 per unit. That leaves you with $125 for your target product cost.
This is the “whole” or “total” product target cost because it is a top-level target cost and is not at a level that your engineers can work to.
The next step is decomposing this total cost into specific functional categories, examining the cost of the major sub-functions (e.g., motor, cooling system, chassis and controls, wheels and drive, and the bagging system) and calculating the percentage of the total cost for each.
These percentages can then be applied to the $125 target cost you derived from your market price for the new mower to determine the target cost for each sub-function. So, if the current cost of your 24-inch mower is $100 and you break it down into the major sub-functions, you know, relatively speaking, how much each one of these sub-functions costs. Note that the actual $30 for the chassis and controls, for example, is not important. It is the percentage that is important.

Figure 2. Use current cost to calculate the percentage of the cost for each major sub-function.
Next, you look at your new mower, the 30-inch mower, which has a target cost for the whole product of $125. You know that if you apply the percentages to the sub-functions, the target cost for the motor is $37.50, for the cooling system is $12.50, and so on down the line, until you get to the bagging system, which is another $12.50 because that was 10% of the total product cost, and 10% of $125 is $12.50.
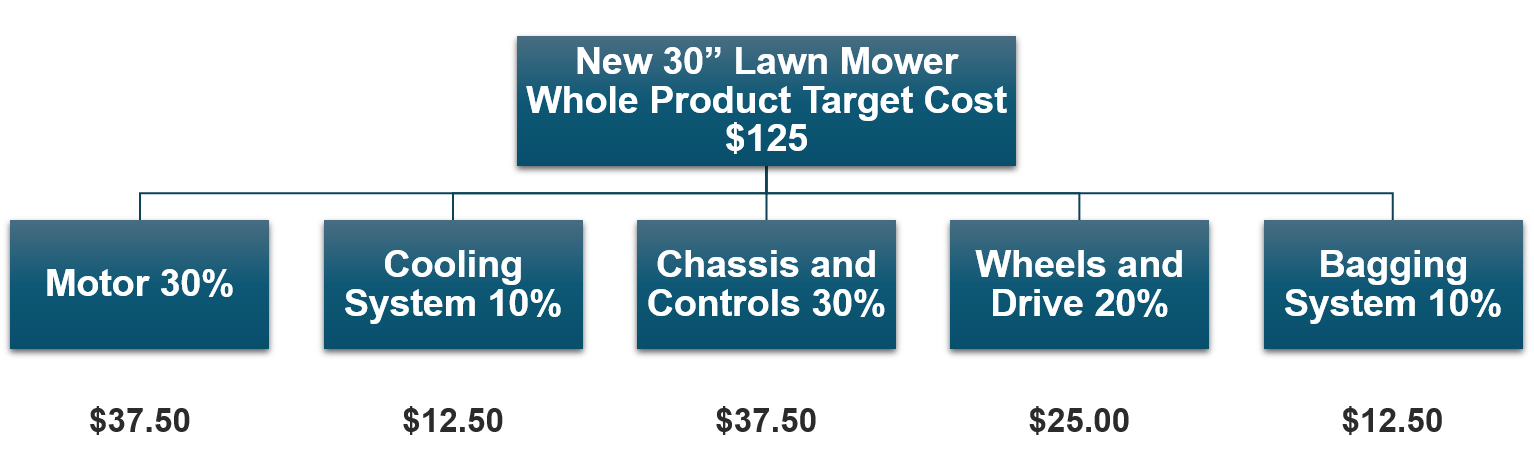
Figure 3. Use the whole product target cost to calculate the target cost of each sub-function.
At this point, you have your cost broken down by sub-function. However, at times, you may need to go further, all the way down to a level where a single engineer or a collaborative team has responsibility, the component level. See our blog on conducting a spend analysis for a deeper dive into breaking down spending at a granular level.
For example, for the bagging system, you would have a support system that a single engineer is likely to work on. If you look at the individual components, you may find out that, in the current bagging system, you have two brackets and two mounting plates that make up the support system for the bag.
If you add the cost of those components for the 24-inch mower, it adds up to $5 or 50% of the bagging system, with the bag itself making up the other 50%. The target cost for the 30-inch mower bag support is then $12.50 times 50%, which gives us $6.25, which the engineer designing the support for the new bag will have to hold to if you want to meet your cost target.
The design engineer for the bag support has a cost target of $6.25, but he or she does not have to do a similar design as the prior support system. They don’t have to employ brackets, for example, at all. They could go in a completely different direction as long as they hold to the same target cost. The same would hold true if a team had design responsibility for a larger scope, like chassis and controls.
In this example, let’s say the new bag support for the 30-inch mower is going to have two hinge hooks and a resting frame. If the hinge hooks are designed to cost $1.25 and the resting frame is designed to cost $2.50, that gives us a total of $3.75 against the cost target of $6.25. In that case, that engineer would have identified about $2.50 of potential cost avoidance for that sub-assembly. This target cost example demonstrates how important the capability to rapidly cost design alternatives is for hitting specified targets.
How to Achieve Cost Targets: The Crucial Link Between Cost Targets and Manufacturing Cost Estimation
1. Find Out Where You Stand
The first secret to hitting cost targets is having them. Manufacturing cost estimation software allows engineers to estimate the cost of producing their products at different stages of the design process. These tools provide excellent guidance when pursuing cost targets, allowing engineers to rapidly cost alternative designs early in product development.
With the most advanced, automation-driven costing software like aPriori, engineers can estimate a cost directly from a 3D CAD model. Every time they make changes, the updated CAD model can be re-evaluated to generate a revised cost for the new design and, nearly immediately, give the engineer feedback regarding the magnitude and the direction of the cost impact of the design changes.
This way, engineers can fluidly assess different design alternatives that they might be considering early in the product life cycle. aPriori also provides actionable analysis of which design choices are driving excessive costs. Is it materials? Is it the manufacturing process? Is it a particular feature? aPriori’s cost-based insights enable engineers to improve their decision-making and make better decisions about design alternatives.
2. Use a Feature-Based Cost Estimating Process
Aberdeen Group research found that best-in-class companies release products that meet cost targets nearly 87% of the time compared to 62% of the time for the average company. These same companies achieve launch dates 85% of the time as compared to 56% of the time for the rest of them.
These high-performing companies are more than twice as likely to have implemented a feature-based cost-estimating process. Specifics may vary, but these organizations all have some capability to identify cost drivers during the design phase and assess the cost impact of different design alternatives.
You can learn more about how these design-stage costing capabilities enable a true Design to Cost strategy in our article.
3. Optimizing Product Costs at a Component Level
After you get a design that performs as you wish it to perform and has the quality and reliability that you expect it to have, there is a lot of pressure to release that design and little time to try out alternatives solely for the purpose of reducing manufacturing cost. This is especially true during a New Product Introduction (NPI) process. Cost optimization efforts need to be strategically prioritized to generate the most possible savings during a market-driven design timeline.
To help engineers focus their time on cost optimizations that have the most potential to yield savings, we consider a few methods for identifying component cost outliers below.
With the first method, if you have a previously designed part serving the same purpose as your new part, use your cost estimating system to cost both the old part and the new part, then divide those costs by the applicable weight of each one to get a ratio. That ratio provides an indication of the cost-effectiveness of your new design vs. the old design.
If the cost estimate for the old design is $4 and the weight is 0.8 lbs., then you have a ratio of $5/lb. Using the same calculation to make an apples-to-apples comparison, the cost estimate of the new design is $7, and the weight is 1.0 lb. for a ratio of $7/lb. This divergence could be an indication that your new design is not nearly as cost-effective as your old design. It may behoove you to spend time optimizing that part.
The second method for analyzing the cost-effectiveness of your design, once you’re done with developing most of your product, requires grouping similar parts (for example, all the aluminum castings, all of the sheet metal brackets, or all of the sheet metal steel parts that weigh less than 10 pounds, etc.) and plotting their estimated cost vs. their estimated weight.
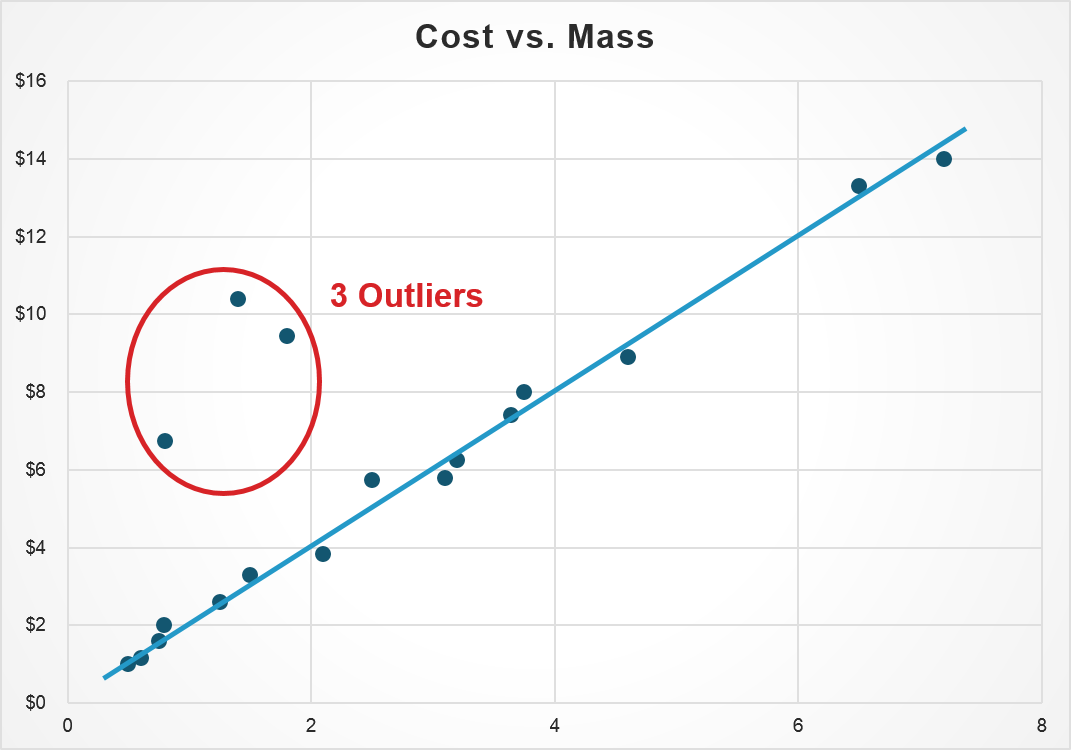
Figure 4. Identify outliers by comparing cost vs. the mass of similar part types.
The plot will show most parts lie along a relatively straight line, but there will be a few that lie outside that line–cost outliers. Something about the design of these parts is making them more expensive relative to their weight. These are the parts you should re-examine for potential cost-reduction opportunities.
Of course, weight isn’t the right variable for every engineering environment. It’s just one example of a basic metric for identifying cost outliers. In aerospace, for instance, weight needs to be minimized throughout the design, which reduces the relevance of a cost-weight calculation. In this context, an analogous metric like cost/lbs.-thrust can generate similar insights.
See our comprehensive guide for a deeper look at component selection and the true anatomy of product cost.
Key Benefits to Supporting Target Costing With Manufacturing Cost Estimation Software
- Tying cost reduction goals directly to design-level variables helps de-silo decision-making between engineers working on different parts of a product. Treating cost as a true design variable enables an organizational Design to Cost strategy.
- Components purchased from suppliers can be rigorously analyzed for cost efficiency. You can learn more about fact-based supplier negotiation in our blog.
- Understanding “should costs” for key components helps pinpoint outliers driving costs up unnecessarily.
- The software helps understand the implication of component choices for complex associated cost-driver life manufacturability, transport, and storage.
Sources:
1. Aberdeen Group, “Using Product Cost Analytics to Keep Engineering on Schedule and Budget,” November 2010
Get a 600% ROI with aPriori
Read the Forrester Total Economic Impact Report to learn how aPriori can cut costs and drive growth.


×
![lightbox-image]()